
On this page, you can see various hints & tips for Pyrography and other crafts, so you can avoid some of the mistakes I made!
Here are some short-cuts to the relevant bits :
Wire-point machine
I use the Peter Childs Pyrography machine, with a heat-reducing accessory box for some of the fine work. I find it easy to work with, and you have a great choice of wire thicknesses, plus the ability to shape your own points as you need them. It's a great machine, simple & easy to use, with a nice light pen, a quick way of swapping points, temperature control - everything you'd want.
Making Wire tips
It's easy! You just snip off a length or wire, maybe about an inch long, and hold it in the middle, ideally with a small pair of needle-nose pliers. Hold it so that about a quarter-inch is held in the jaws, and bend both ends the same way, so you get a "square loop". Then hold the end of the loop in the jaws, so that about quarter of an inch of the loop end is trapped in the jaws, with the loop on one side of the jaws, and the two tails on the other. Hold it very firmly, and spread the ends out, away from each other at 45 degrees. Move the jaws down, to hold a quarter-inch of the splayed tails, and bend them in parallel again. Now you should have something that looks like a pen nib - a wire tip!
You can make these points as wide or as narrow as you like - a very common tip is one where the "loop" is actually of no width at all, ie the wire is doubled back on itself completely. This is great for fine lines, tiny dots, etc. You can even make it sharper, by squashing it hard with the pliers, or filing it down, on sandpaper or a file.
To fit it, you just undo the pen terminals a bit with a small screwdriver, insert one end of the loop in each terminal, and do them up again very firmly. I actually like my tips to be kind of "stepped", so that they don't extend straight out from the pen, but are stepped downwards, closer to the work.To do thus, hold the narrow part of the loop in the pliers, like you did when bending out the tails, and push both tails upwards a bit. Shift the jaws to hold the splayed part of the tails, and push those downwards the same amount. Then you put it in the pen so that the tip is closer to the work than the tails, and it makes it easier to get a smooth line. Or I suppose you could just bend it to where you want it while the tip is mounted in the pen.
Working on Plywood
I started working on plywood, as you can see here. I used the fine points for most of the work, and the spoon point for some of the shading. But the stripes are rather obtrusive - that's why plywood's not made it as a popular choice of surface, I guess!
Working with Grain patterns
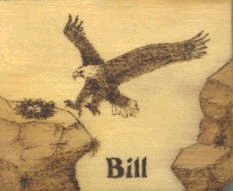
So, I thought that perhaps it would be better to try & work with the grain of the wood, rather than just place a design over it. I examined all the pieces of plywood carefully, looking for shapes that suggested a design. I found one where the darker areas looked like cliffs against the sky, and made this picture. I took the eagle outline from some clip art, then designed the rest around it, using the contours of the plywood's grain. Very quick, light movements of the pen were needed to get the feather effects in the eagle's wings. Using the grain like this proved far more successful, as the colours of the wood give nice background tints to the picture, rather than being an obtrusive pattern over the design. Much better...
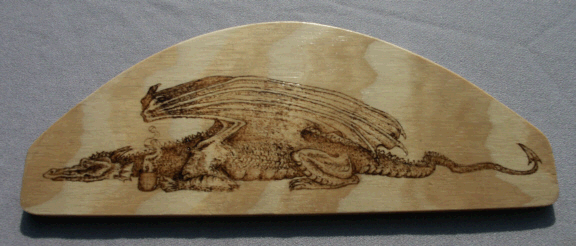
Flushed with the success of this technique, I tried another piece of plywood with an interesting grain pattern, this time completely freehand - risky! The shapes of the grain suggested a mountain range, with trees below, and so I worked with this to make a landscape. The arch hides a defect in the wood, making it into a feature of the design instead! When I was done, the sky looked too empty, so I added a dragon in flight, making this piece. Shading the sides of the mountains was very difficult, as these pale, soft areas burn very quickly, even with the lowest heat setting and a spoon point. This is where (with hindsight) a thicker wire point would have been far more appropriate.
Cutting out
When I realised I now had some nice designs stuck in the middle of great big chunks of plywood, I cut out all these pieces with an electric jigsaw, and sanded the rounded edges smooth. To do this, I used a belt sander, with some assistance from Bill, who's been doing this for years. In doing this, I learned several very useful things -
1) you really should do this before you start work, not after you have finished your design, as it's very easy to dirty or damage your work,
2) belt sanders eat away both wood and fingernails at a truly frightening rate, and
3) getting a nice smooth curve on something is virtually impossible for me, but simple for Bill!
I tried using my newly-purchased (from the excellent ScrewFix Direct) electric scroll-saw (wheee - a new toy!) to cut out the Celtic Triangle design, and found that this isn't as easy as it looks, either. I recommend a very slow pace of cut, and planning your curves ahead - like sewing round corners with a sewing machine. And do mind your fingers, 'cos that blade won't even notice slicing into your nice soft digits...
Working on Oak
I found the oak for the cards quite difficult to work with, as it has a grain with myriads of tiny dents that just will not sand smooth. It also does not seem to take on shades as it burns, so your work is basically monochrome - burned or not burned. But I think the designs I made suit the "pen & ink" look, and so the end result looks pretty good. However, the internal text proved very difficult, and ended up somewhat uneven. I tried making various points with the fine wire that came with the machine, but couldn't eliminate the tendency of the oak to char very quickly and blotchily. Now I know (from Roy Childs' very helpful advice) that what I really needed to use was thicker wire, to make a cooler point... hindsight again!
Varnishing
To protect my work, I now give everything a couple of coats of water-based (PVA) clear satin varnish on both sides, rubbing them down lightly with some wire wool in between.
This has given them a nice finish, hasn't changed their appearance too much, and has prevented them from becoming grubby with handling, which was happening surprisingly quickly. It's great stuff, PVA varnish - water based, doesn't smell, and this kind doesn't come up too shiny. I don't know how it'll perform over time, but I've used it on shelves & such and they haven't discoloured yet.
Framing
About 6 months after I got the machine, I'd decided that what the square pictures needed was framing, as the raw edges of plywood aren't all that appealing. As you can see, they look so much nicer when framed. So, Bill to the rescue once again, bringing me home a huge box as a surprise one day - a mitre saw! Yay! So, we bought some moulding (too much fuss to make it, even though theoretically we could do it with a router) from Homebase, and put the saw together, and had a go. I did have to buy a different blade for the saw, though, as the one that came with it was ideal for cutting skirting-board or whatever, but a bit over the top for such tiny, thin moulding.
It's fiddly to do, cutting moulding & making frames, but by no means impossible. PVA glue works fine for fixing the corners together, and the pictures into their frames - you don't need pins or anything. You do need mitre clamps, though, to get two sets of corners made. After that, when you glue those together into a frame, you can use rubber bands to hold it all together - Less than professional, but it works! It's a swine to keep it all square, though - you MUST have the pairs of sides exactly the same length, and all the corners exactly 45 degrees - sounds obvious, but it's not at all simple to actually achieve! And it does really seem to make the pictures look better.
Thicker Wire Tips
As I worked, I found that the wire was always rather hot, which for some of the pieces of wood was a problem. On Roy Childs' advice, I bought some thicker wire for the machine, (you can order it from Peter Childs online) which runs cooler than the very thin stuff that comes with the machine. I found that this allowed me to do much more subtle shading, shadowing, etc. Although, as a 1oz reel of each size of wire is the smallest quantity you can buy, I now have enough nichrome wire to last me a lifetime!
You can also get different effects by shaping the wire point in different ways. It bends easily, especially with a pair of needle-nose pliers, and you can also mistreat the wire itself into sharp points, edges, etc, with a file or pliers, or even some wet-&-dry paper. (Which just happens to be in the garage...) Peter Childs also sell some new, flat sort of wire now, that can give you some other different effects.
Now I had this variety of wire, I thought I'd try out the very thick stuff, and made the small Swan with it alone. An interesting experiment, especially as the wood was very soft. The heat and pressure made it shiny, as though it were burnished.
You can also get a heat reduction box from Peter Childs for the machine, which halves the heat of the tip. This is very useful, too, especially for work on leather or on soft woods. It means that you can get a low heat on a fine wire tip, which is otherwise not possible. You just plug the lead on the box into the socket on the machine, then plug the lead on the pen into the box. Couldn't be simpler!
Engraving
While out & about in Watford in summer, about 8 or 9 months after I started pyrography, Bill found a flexible drive in one of those sells-everything toolshops, and bought it for me. We already have several mini drills of various types, and quite a few little tiny drill-bits, sanding things, funny-shaped stone whatsits on little shafts, some dentists' drills (that I talked my dentist out of!) and so on - even some diamond burrs.
So, now I can use the drillbits, etc, to do fine work, ie without having to hold the entire drill in my hand, I've had fun trying to engrave various items! Although I haven't had a chance to do much so far.
I engraved the little dragon glass for my sister, Wendy, with a dragon design. This was an adaptation of a sketch I found on the internet somewhere. I used several diamond-coated burrs, and tried tipp-ex and marker pen to transfer the design. Oddly, the marker pen worked better, and made less mess, despite being black instead of the recommended white.
I'll have to have another go at this - I have some more glass things, and a few metal items, too.
Working on Leather
Leather is a very different material, and far easier to work with, as there is no grain. The best that I can say about the feel of it is that working on wood is kind of like sketching in pencil, but working on leather is more like drawing with felt-tips. You get a definite, positive mark, that doesn't come off no matter what!
But the leather picks up marks like you wouldn't believe - pencil, pen, oil & general grub from your hands, everything. It'll pick up biro from your fingers, and even kneadable eraser will stick to the blasted stuff. The pencil will come off, but everything else is pretty much there to stay. An ink rubber doesn't help, and does destroy the finish - don't even try!
I find I have to work on leather with a sheet of plain paper under my hand all the time, and go & specifically scrub my hands thoroughly before I start, making sure they're really dry again before starting. That seems to work...
On my PC machine, even the thickest wire gives a very positive black mark and a distinctly nasty smell. Using the diode box (with everything but the thick wire - the box can't cope with that) brings it down to a reasonable temperature for a light to medium line, and I find that I can shade OK with a wide loop of 24 swg on a medium setting with the diode box.
I finish my leather items with Meltonian neutral shoe cream, or any generic neutral shoe wax. This looks AWFUL when you put it on, as it soaks in, and you'll think you've ruined everything, but it dries out OK, doesn't smell bad, and doesn't even seem to change the colour too much. Using the shoe cream seems to leave the surface matt, but using the wax (and a bit of clean rag & some elbow grease) gives it a glossy finish. If you use the sort of shoepolish with a built-in applicator, give the item a couple of coats, allowing it to dry in-between, it comes out great - even pretty much waterproof.
Cutting leather smoothly is very awkward - you need an extremely sharp knife, and even then it tends to drag, & cut unevenly. You need to stamp it, really, but (unsurprisingly) I don't have a set of custom leather punches, and the special cutting flypress to put them in!
Line work on leather is especially fiddly! You have no way of recovering if you get it wrong, and every little slip shows up with crystal clarity. Again, this was another piece of scrap leather.
You need a very cool tip for this - even the thickest wire is too hot. These were made with thinner wire, and using the special heat-reducing diode box I got from Roy Childs. This works SO well for leather...
Writing on Leather
I found a font that could be reproduced with a single stroke, and made a set of 6 special writing nibs. They have a flat end, shaped as though you drew a line round the edge of a calligraphy nib - from 1mm to 5mm wide. The wider the nib, the higher the heat needed to make it draw evenly. Works brilliantly on leather, giving a constant depth of colour as a single stroke (as long as you keep the speed constant), but pretty useless on wood.
Fume extraction
When doing a lot of leather items, with dark burning, the smell of scorching leather got a bit oppressive, and started to irritate my eyes & throat a bit. Bill came to my rescue yet again, with a fan designed for use when soldering. It draws fumes into itself, and out via a special carbon filter - brilliant! Placed in front of me, beyond the work, it pulls all the smoke away, and is nice & quiet, too. Not sure where you'd get one at a reasonable price, though...
Awkward items and pictures
When working on some bookends, I had some problems with getting a good working position. It was somewhat awkward to work on them, because of their shape. I ended up making a sort of dais to support the bookend lying down, and a platform alongside it for my arm, to get just that little bit higher. And, because sycamore marks so easily, and as you have to keep sliding the object around to get a good angle on it, covering that with a sheet of white paper.
I also think it's harder when the subject is something "real" - after all, nobody knows how long a dragon's legs are, or what it's eyes are really like, but it looks funny if there's something the least bit "off" on an animal we know well. It seems to work better if done upside-down, so you reproduce the shapes, and don't think of it as being a tiger at all. This worked well for the test piece, and for this final large commission piece, also. Odd, but there you are!
Transferring designs
I've recently been asked about ways of getting patterns down onto wood or leather. I've found that there's a few ways you can do this, if you don't fancy pencilling or pyrographing directly onto the item.
One easy way is to use a pencil & tracing paper, just like you used to do at school. Trace the design in pencil, then turn it over and transfer it by rubbing it down or by retracing the lines firmly. Remember that this does, of course, reverse the design. It's worth getting some decent tough tracing paper - then you can re-use the same design several times.
When I say "rub it down" I mean using a pen or pencil to scribble or shade over the lines on the reverse. You need a close, even spacing, and a firm pressure. Not too hard, or you'll make the wood, but not too gentle, either, or the design won't transfer. I use a run-out biro pen for this - it avoids getting ink on your hands and on the piece - it's not removable!
Another way is to use graphite paper, otherwise known as "tracedown". This is like the old carbon paper, but is coated with pure graphite (ie pencil lead ) on one side, rather than carbon black or carbon blue. Then you can place this between your design (a tracing or a printed original) and trace firmly over the outline (I use that same run-out finepoint biro) to transfer the design. Works nicely, and because it's pure graphite, you can rub out any unwanted lines.
You can buy this from most good-quality artist's shops, and I'm sure I saw some for sale online, but nake sure it's the graphite sort you buy - there are others. You can make your own tracedown, by scribbling pencil evenly all over a sheet of good-quality paper, but it's a messy job, and the paper degrades quickly. Real graphite paper is pretty tough, and lasts for a long while, as only a little of the graphite is used each time, but it is expensive. Also, the graphite will transfer to your hands if you touch the black side - I keep mine in a plastic document wallet, with two pieces face-to-face.
You can use traditional black or blue carbon paper, but it's far from ideal - this was the first thing I tried, before I heard of tracedown, and it's not great. The ink is kind of waxy & weird, and it seems to sink into the wood as you burn. It's very hard to burn away, gets everywhere as you trace down, and will NOT rub out, no matter what you do. You can't even sand it off! So, only good if you can be sure you won't make (or can cover up) any unwanted marks, and if you're doing something so black that it won't show!
Another neat trick is to transfer directly from a printed design! I've found that I can rub down almost anything printed on an inkjet printer, just by placing it ink-side-down on the item and rubbing it down firmly and evenly. You get a very good quality transfer, showing every little detail, onto wood, and a quite usable one onto leather. Plus, it does rub out, provided you take care & use a good quality eraser.
To do this, you must wait till the ink is completely dry before using the design, or it goes all smudgy. But after that it seems to work no matter how long ago it was printed - I've rubbed down patterns that I printed weeks ago. Plus, you can re-use the design a couple of times before the paper degrades and won't work any more. I don't think this will work with with laserprinted or photocopied stuff, as that uses heat-bonded toner, but it should be OK with any print method that uses actual ink. Mind you, I have found some ink that doesn't work at all...
However you work, be careful not to press too hard on leather - the natural "give" of the material makes your point deform the paper more than on wood, and it can punch straight through, destroying your papers. Also, it can help to go over the design a couple of times, with "scribble" from different angles - it seems to give a clearer image, but be very sure your design doesn't move about.
You do need a good eraser, too. I use a kneadable eraser to lift off most marks (very gently on leather, or it'll stick), and a Staedtler "mars plastic" eraser for the tougher stuff. An inkrubber (the gritty sort) can be useful on wood, but will ruin the finish of leather. Anyway, a scrap of fine sandpaper works better on wood, for anything a normal eraser won't take out.
Solid-point machine
I also just acquired a new machine - a Janik solid-point G4 one, so I have a new toy to play with! It looks to me as though this could be better for bold, heavy designs, where there's an expanse of solid black. I have trouble doing this on wood with the PC machine, and I thought the solid tip could be better for this kind of work.
After some experimentation, I think I prefer my hot-wire machine, though. The solid-point is still less subtle that the hot-wire, being a bit of resistance wire wound round a lump of metal! The point seems to take a very long while to get hot, and then isn't very controllable. Plus, I don't like the way that the point is so far from my fingers, nor the way that the whole thing gets really quite hot! And I still can't see how you get a really solid black area in any reliable fashion or reasonable timeframe... I guess I need more practice. And to re-read the book I bought about it!
You can read more about the individual items here, or find out more about me here, if you're interested! "Thanks" to everybody who's helped me, and to all the great suppliers who make the items I decorate!
